# Adding it to your game
## Downloading the product
After [logging into the website](https://docs.easypos.lol/products/easyexpress/broken-reference), press 'Download' on the product card.
Downloading easyExpress
## Preparing your game
For our products to work, the game owner must be in the [easyPOS group](https://www.roblox.com/groups/32675391/easyPOS).
Adding onto this, [HTTP requests must be enabled](https://docs.easypos.lol/products/easyexpress/broken-reference).
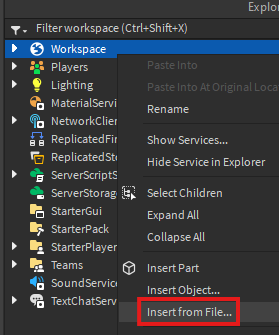
## Inserting the product
To add easyExpress to your game, right click 'Workspace' and press 'Insert from File'.
Right clicking 'Workspace' in Explorer then pressing 'Insert from File'
Afterwards, locate the file you downloaded from our website and submit it.
Next, move each model to the respective location, as shown below.
{% embed url="" %}
Moving each model to the correct location
{% endembed %}
{% hint style="info" %}
Make sure you move the 'ReplicatedFirst' model to ReplicatedFirst, **not ReplicatedStorage**.
{% endhint %}
Now, right click each of the models you just moved and click 'Ungroup'.
{% embed url="" %}
Ungrouping the models
{% endembed %}
You can delete the initial folder which the models were found in.
{% embed url="" %}
Deleting the original folder
{% endembed %}